Last tested: March 2026 | Generated on VicSee
Most people using Kling 3.0 are prompting the wrong thing.
They describe what the scene looks like. The location, the subject, the mood. And they get a clip that moves, technically speaking — but it doesn't feel like footage. It feels like an animation. Something is off, and they can't name it.
What's off is the camera. The scene is described. The camera is forgotten.
Kling 3.0 changed something that earlier AI video models didn't have: it responds to camera language the same way a real camera does. A "slow dolly in" executes like a slow dolly in, not an approximation of one. "Orbital tracking at shoulder height" resolves correctly. "Handheld push toward the door" adds the micro-jitter a handheld camera would have.
This isn't a small upgrade. It shifts the entire skill gap. The difference between a generic Kling clip and something that looks like real footage isn't subject matter or prompt length. It's shot selection. And shot selection is a directing skill, not a prompting skill.
This guide covers the specific camera vocabulary that Kling 3.0 executes reliably, how to pair camera moves with subject action, and why the creators getting the best results from Kling 3.0 are thinking like cinematographers.
Why Camera Language Is the Primary Variable
Every visual medium has a primary variable — the thing that separates competent work from great work. In painting it's composition. In photography it's light. In writing it's voice.
In AI video, the primary variable used to be subject quality. Get a great base image, describe it precisely, and the model would animate it reasonably well. Camera was an afterthought.
Kling 3.0 shifted this. When creator and filmmaker @AngryTomtweets tested "camera language as a first-class prompt element," the finding was clear: the skill gap in Kling 3.0 has moved from technical execution to shot selection. You no longer need to engineer prompts. You need to choose shots.
Here's what that means practically:
Before (Kling 2.x era thinking):
"A woman walks down a rainy street at night under a neon sign, looking sad"
After (Kling 3.0 directing):
"She walks forward, head down against the rain. The camera tracks at her pace from slightly behind and below, holding a low medium shot as she passes under the neon sign — its reflection fragmenting in each puddle."
Same subject. Completely different clip. The second version gives the camera a job, a position, and a behavior. Kling 3.0 executes the job.
The practical shift: stop writing descriptions and start writing shot lists.
Once you see Kling 3.0 as a camera that responds to direction — not a model that responds to descriptions — the quality of your outputs changes immediately. You're not prompting anymore. You're directing.
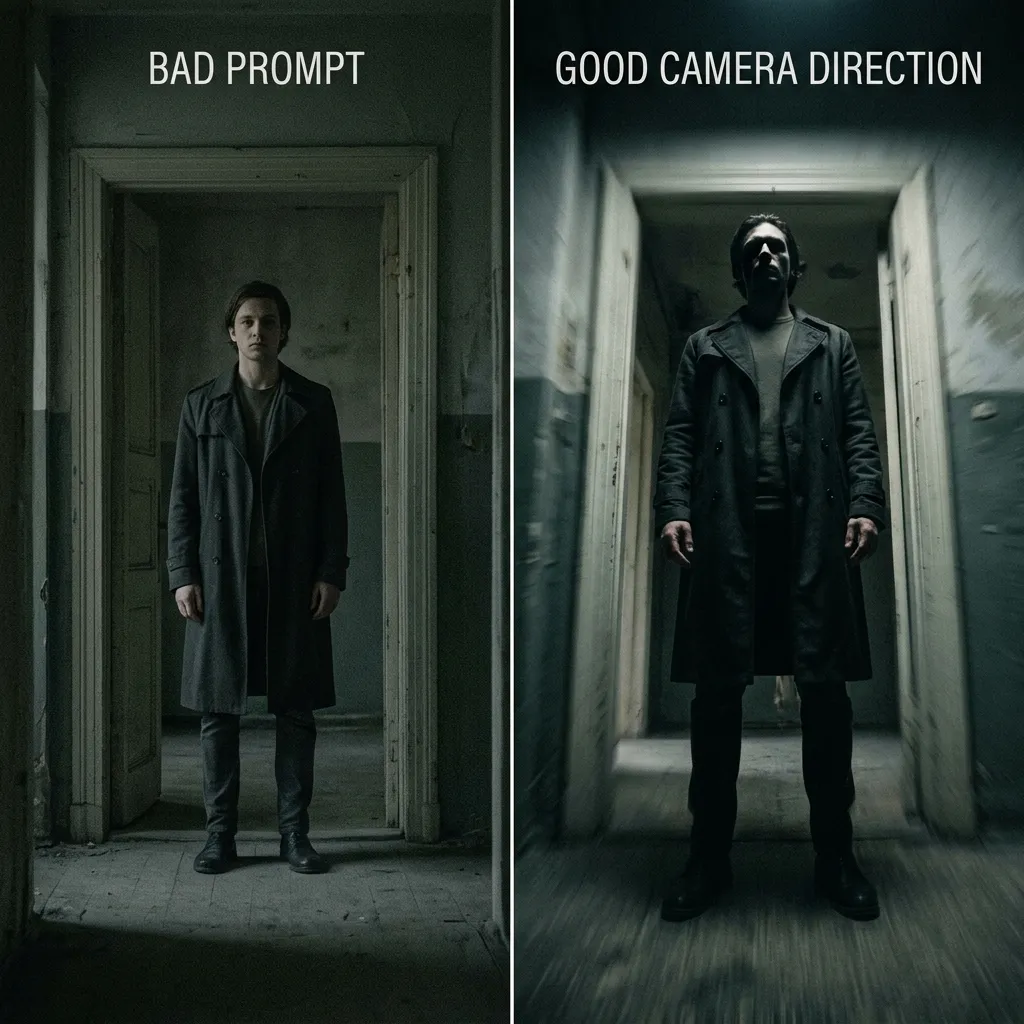
Same subject, same scene. Left: no camera direction — flat, static, generic. Right: low-angle dolly push with motion blur — cinematic weight in every frame.
The Shot Vocabulary That Executes Reliably
Not all camera instructions execute with equal fidelity. These are the moves that consistently produce the intended result in Kling 3.0:
1. The Dolly (Push In / Pull Out)
The most reliable camera move in Kling 3.0. A controlled forward or backward camera movement along the subject's axis.
- Push in: "slow dolly in toward her face" → camera moves forward, subject grows in frame
- Pull out: "the camera pulls back to reveal the room behind him" → reverse reveal
- Timing: Add slow, medium, or fast to control pacing. "Slow dolly in" produces the cinematic weight of a dramatic close-up. "Fast push to black" produces a cut-like effect.
Why it matters: The dolly is the camera's way of expressing emotional closeness. Moving toward a face = intimacy, revelation, confrontation. Moving away = release, context, smallness. Kling 3.0 connects this movement to the emotional register of the scene. A slow push toward a character mid-silence lands differently than a fast cut to the same framing.
Example prompt addition: ... the camera dollies in slowly as she reads the letter, holding her expression tight until her jaw sets and she folds it
2. The Orbit (360° and Partial)
A camera move that circles the subject, keeping it in frame throughout.
- Half orbit: "the camera orbits around her in a half circle, revealing the city below"
- Full orbit: "slow 360° orbit around the car as it sits on the cliff edge"
- Height variation: "orbiting at knee height" vs "orbiting overhead" produce completely different spatial readings
Why it matters: The orbit is cinema shorthand for significance — you circle something because it matters. It's used for reveals (orbiting a statue to show scale), romance (orbiting two people to isolate them), and tension (orbiting a figure who isn't moving). Kling 3.0 holds the subject centered during the orbit, which is harder than it sounds for an AI model.
Tip: Pair an orbit with a subject action that plays well at multiple angles: "she raises the sword overhead as the camera orbits — each angle reveals different detail — the inscription on the blade, the crowd watching, the storm approaching behind her."
3. The Tracking Shot
The camera moves with the subject, maintaining a consistent spatial relationship.
- Side track: "the camera tracks alongside him as he runs, matching his speed"
- Follow from behind: "tracking close behind her as she moves through the market crowd"
- Lead track: "the camera moves ahead of the car, tracking backwards to keep it in frame as it accelerates"
Why it matters: Tracking shots create participation — you feel like you're moving with the subject, not watching them from outside. They work especially well for pace changes: a slow track during a walk that accelerates into a fast track during a run naturally compresses the tension.
Important: Specify a starting distance. "Tracks alongside" is ambiguous about height and proximity. "Tracks at waist height from 8 feet to the left" gives the model a locked spatial relationship to maintain.
4. The Crane (Vertical Reveals)
The camera moves vertically — typically a rise that reveals scale or a drop that reveals a target.
- Rising: "the camera rises slowly from street level to above the rooftops, the city spreading out below"
- Dropping: "the camera cranes down from the mountain peak to land on the figure below"
Why it matters: Vertical camera movement conveys scope. A rising crane at the end of a scene says "this moment was big." A dropping crane says "here is what matters in this landscape." Use it for establishing scale that a cut or pan wouldn't communicate.
5. The Handheld Push
Not a locked camera move — a controlled forward movement with natural micro-movement baked in.
- Instruction: "handheld push toward the door" or "handheld tracking — urgent, slightly unsteady"
- Effect: The micro-jitter reads as documentary realism. Events feel like they're happening, not staged.
When to use it: Handheld is the right call when the scene's realism matters more than its visual beauty. Conflict, urgency, found footage, run-and-gun documentary. If you want your clip to feel captured rather than composed, handheld is the instruction.
6. The Motivated Cut (in Multi-Shot)
Kling 3.0's multi-shot feature lets you sequence clips with transitions. The camera language for transitions matters.
- Hard cut: omit camera instructions on the clip boundary — the model cuts directly
- Match cut: "the camera holds tight on his hand reaching for the door handle... [next shot] from inside, as the handle turns"
- Contrast cut: "wide exterior night shot" → "close interior — same moment, different angle"
Why it matters: Multi-shot prompting is where Kling 3.0's camera responsiveness becomes a full editing language. You're not just prompting individual clips — you're sequencing them with camera continuity.
Combining Camera and Subject Action
The camera prompt and the subject action aren't separate. They should create a single motion arc.
The pattern that consistently produces cinematic results:
- Start the subject action (establishes the scene's energy)
- Move the camera in response (the camera reacts to the action)
- Land on a moment (the camera arrives somewhere that frames the emotional peak)
Example — building this three-part structure:
She lifts the trophy slowly above her head, tears streaming. The camera rises with her arms — held low at chest height at the start, finishing overhead as the trophy breaks the light. It holds there for a beat before the crowd rushes in.
What's happening: subject action starts (trophy lift), camera moves in response (rises with arms), lands on a moment (overhead, held still as crowd enters). The camera's starting position, direction, and final position are all specified. Kling 3.0 executes each.
The 15-Second Consistency Test
Here's an insight that changes how you evaluate Kling 3.0 outputs: consistency over a full 15-second clip matters more than the quality of any individual frame.
It's easy to get a beautiful moment — a dramatic push-in, a perfect expression, a great light catch. What's harder is maintaining character consistency, camera logic, and scene coherence across the full duration.
When testing camera prompts, the right comparison to run isn't "does this look better than that one?" It's: "does the camera behavior stay intentional for the whole clip? Does the character hold? Does the cut feel motivated?"
This is especially true for dialogue and lipsync — where a camera that drifts in the second half of the clip breaks the illusion entirely. A locked-off medium shot that holds steady for 15 seconds of dialogue will read better than a dynamic push-in that destabilizes halfway through.
Practical implication: For dialogue scenes, start with stable camera language. "Hold on a medium two-shot" or "locked-off over-shoulder" before you experiment with movement. Get consistency first. Add dynamics second.
Prompt Adherence Beats Resolution
One more calibration before the prompt examples: when evaluating Kling 3.0 outputs, the gap between 720p and 1080p matters less than whether the prompt actually executed.
Resolution is fixable in post — upscaling, sharpening, denoising. These are solved problems. But if the camera move you specified didn't execute — if the "slow dolly in" became a static frame, or the "tracking shot" became a pan — that's a generation failure that no post-processing fixes. You need to regenerate.
This means your quality bar should be: did the camera do what I told it to do?
A 720p clip where the dolly executed perfectly is a better result than a 1080p clip where the camera drifted. Prioritize shot adherence when evaluating outputs. Regenerate when the camera language wasn't followed.
8 Camera-Focused Prompt Examples
These prompts are built around a specific camera move, with the subject action designed to work with it rather than against it.
1. The Slow Push Through Doorway
She appears in the doorway — silhouetted, still. The camera pushes in slowly from medium distance, passing through the threshold, until her face fills the frame and the light source behind her bleeds into the background. She doesn't move. The camera does all the work.
Camera: Dolly push through a plane (threshold acts as a visual gate)
Why: The doorway creates a before/after — exterior/interior, unknown/revealed. The push-through executes the revelation physically.
2. The Orbital Reveal
The rusted statue stands at the center of the crumbling plaza. The camera begins at street level facing it head-on, then orbits counterclockwise, rising slightly as it completes the half-turn — revealing the collapsed skyline beyond it that was invisible from the front angle.
Camera: Rising orbit with subject as axis
Why: The reveal lands because it's information the viewer doesn't have until the camera earns it through movement.
3. The Tracking Close-Up
He moves through the crowded station, face tight with urgency. The camera tracks at shoulder height, matching his pace exactly — staying close enough to read his expression but far enough to catch the crowd reacting around him as he passes. He doesn't slow down. The camera doesn't either.
Camera: Lateral tracking at shoulder height, pace-locked to subject
Why: The locked pace creates participation. You're not watching him run — you're running with him.
4. The Reaction Pull-Back
She opens the door and stops. The camera holds tight on her face for one beat — then pulls back steadily, smoothly, until we see what she's looking at: the entire room filled with people, every one of them watching her.
Camera: Hold + pull-back reveal
Why: The reveal is earned by withholding it. The pull-back creates scale that a cut to a wide shot wouldn't.
5. The Crane Descent
From high above the forest canopy, the camera drifts down through the treetops, branches brushing past as it descends — light fragmenting through leaves — until it lands at ground level on the small fire burning in the clearing, two figures barely visible beyond it.
Camera: Descending crane through layers
Why: The descent through natural layers (canopy, mid-canopy, undergrowth, ground) creates texture that a simple cut from aerial to ground wouldn't have.
6. The Handheld Chase
They sprint through the alley, legs hammering the wet cobblestones. The camera chases from behind — handheld, urgent, slightly unsteady — keeping them in the center third of the frame but struggling to hold them as they change direction. The camera narrowly makes the corner they take.
Camera: Handheld tracking chase, subject leading
Why: The "struggling to hold them" and "narrowly makes the corner" instructions create the sense of a real operator running with real limitations. It reads as documentary urgency.
7. The Locked Dialogue Shot
Two people across a café table. The camera holds a medium two-shot from a slight low angle, locked off. Neither of them moves much. The scene is in their hands, their voices, the micro-expressions between words. The camera lets them carry it.
Camera: Locked-off medium two-shot, low angle
Why: The locked camera is itself an instruction — it says the scene's energy is human, not cinematic. The low angle gives both subjects slight authority without elevating either one.
8. The First-Person Descent
The camera moves as a person descending stairs in an old building — a gentle bob with each step, one hand trailing along the wall to the right, the beam of a flashlight preceding it into the dark below. The bottom of the staircase isn't visible yet.
Camera: First-person POV with simulated physics (stair bob, wall contact)
Why: The first-person instruction with physical details (bob, hand contact, flashlight) creates embodied perspective without a visible subject. The withheld bottom creates forward pull.
New accounts get free credits, no credit card required.
Try it now: Kling 3.0 | All Video Models
Putting It Together
The creators getting the best results from Kling 3.0 have made one shift: they stopped writing prompts and started writing shot descriptions.
A shot description includes:
- Camera position (where is the camera at the start?)
- Camera movement (what does it do, and how fast?)
- Subject action (what is the subject doing during the movement?)
- Landing point (where does the camera end up, and what does that final frame contain?)
Every example in this guide follows that structure. The camera has a starting position, a job to do, and a place to land. The subject's action is designed to work with the camera, not fight it.
Once you see Kling 3.0 as a camera that responds to direction — not a model that responds to descriptions — the quality of your outputs changes immediately. You're not prompting anymore. You're directing.
FAQ
What's the difference between a pan and a track in Kling 3.0?
A pan rotates the camera on its axis (like turning your head) while the camera stays in one place. A track physically moves the camera through space while keeping the subject in frame. Kling 3.0 executes both, but tracks produce more cinematic results for moving subjects — the spatial relationship between camera and subject changes, which creates depth.
Does camera language work in text-to-video or only image-to-video?
Both modes respond to camera language, but image-to-video gives you more control. When you set a specific starting frame, the camera has a defined position to move from. In text-to-video, the model chooses the starting frame, which means the camera movement may start from a position you didn't intend. For precise camera work, use image-to-video.
How do I get a camera move to execute for the full clip duration?
Specify the duration of the camera movement explicitly. "Slow dolly in over 8 seconds" is more reliable than "slow dolly in" — the model knows how long it has to complete the move. Without a duration, models often complete the move in the first few seconds and hold the rest static.
What camera moves does Kling 3.0 struggle with?
Complex multi-axis moves (a simultaneous tilt, pan, and dolly) and very fast camera movements tend to produce inconsistent results. Keep camera instructions to one primary move per clip. If you need a complex sequence, use Kling 3.0's multi-shot feature to chain simpler moves across separate clips.
Should I use 5-second or 10-second clips for camera work?
For single camera moves (dolly, orbit, track), 5-8 seconds is usually enough. For reveals that require setup time (the crane through the canopy, the pull-back that reveals scale), 10 seconds gives the move room to breathe. Short clips with one clear camera move usually outperform long clips trying to do too much.
The camera vocabulary in this guide works today on Kling 3.0 via VicSee. Generate base images with Nano Banana 2, animate them with Kling 3.0, and apply these camera instructions directly. New accounts get free credits, no credit card required.
All prompts tested by JZ on VicSee using Kling 3.0. Last updated: March 2026.