You prompt "photorealistic portrait" and get a plastic mannequin. You add "ultra realistic skin texture" and get a slightly shinier plastic mannequin. The problem isn't your vocabulary — it's physics.
AI portraits look plastic because of a property called subsurface scattering, and fixing it changes how you think about portrait prompts entirely.
The Physics Problem: What Real Skin Does
Human skin is not a surface. It's a translucent material — light doesn't just bounce off the top layer, it enters the tissue, scatters through it, and exits at a slightly different point. That internal scatter is what gives real skin its warmth, depth, and life.
When AI models render "realistic skin," most default to an opaque surface model. Light hits the face and bounces straight back. The result looks like polished plastic or porcelain — technically sharp, technically detailed, but fundamentally wrong.
This property — subsurface scattering — is what distinguishes a photograph of a person from a render of a face. It's not a resolution problem. It's not a detail problem. It's a lighting physics problem.
The fix isn't a better keyword. It's telling the model what the light is doing.
Fix 1: Specify Light, Not "Realism"
The most common mistake in portrait prompts is using quality keywords — "photorealistic", "ultra realistic", "hyperdetailed skin" — when you should be specifying the lighting environment.
Lighting instruction does the work that quality keywords can't. Here's why: a model can't render accurate subsurface scattering unless it knows the light source, its intensity, and its direction. "Photorealistic" is an output quality target, not a physical description. The model doesn't know what physics to apply.
Compare these two approaches on Nano Banana 2:
Keyword approach:
photorealistic portrait, hyperdetailed skin texture, ultra realistic
Light-specified approach:
portrait, warm afternoon window light, soft diffusion, slight backlighting catching the ear and jawline, natural skin translucency
Both produce a portrait. The difference is depth. The keyword approach gives the model a quality target but no physical scene — the model fills in lighting with whatever is statistically common, which tends to be flat and even. The light-specified approach gives the model something to simulate: a window, an angle, a direction for shadows to fall. The skin catches and scatters that light rather than just reflecting it.

[caption: Left: quality keywords only — even, flat. Right: lighting description — directional, dimensional, more photographic feel.]
The same principle applies to color. Saying "fuchsia dress" gives you a flat fill. Saying "dressed in intense direct sunlight with hard shadows" makes the dress pop with more saturation than any color keyword achieves. The light determines the color, not the name.
Want to test this yourself? Nano Banana 2 on VicSee handles both approaches — and the difference is visible in a single comparison. New accounts get free credits, no credit card required.
Try it now: Nano Banana 2 | Nano Banana Pro | All Image Models
Fix 2: Reference Image Quality Is Step 0
If you're using a reference photo — for character consistency, for style transfer, or for identity preservation — the quality of that reference shapes every generation that follows.
Most people grab any photo and upload it. The problem is that a reference with harsh shadows, poor lighting, or an off-angle crop trains the model to reproduce those problems at scale. If your reference has a face half in shadow, every variation inherits that shadow.
For Nano Banana 2, the reference image requirements are specific:
- Neutral lighting — flat, even, no directional shadows
- Portrait crop — face filling most of the frame
- Clean background — minimal distraction, no competing elements
- No hard shadows — especially under the nose and chin
Generate the reference first. Run it through 3-4 variations without any reference to check how the model interprets it on its own. If the variations are consistent, the reference is clean. If they drift — different face shapes, inconsistent features — adjust the reference before scaling.
A clean reference frame is worth more than any prompt technique. It sets the baseline the model uses for every subsequent generation.
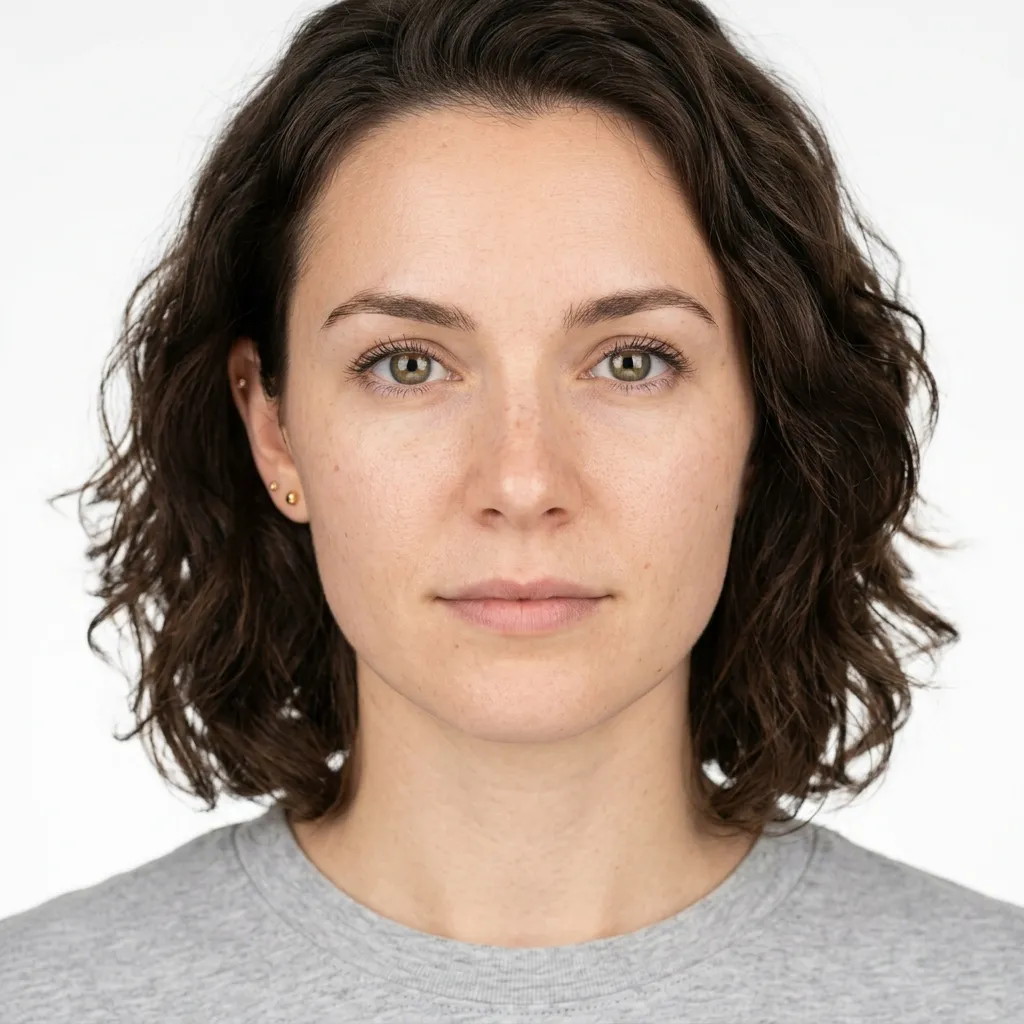
[caption: A clean reference: neutral studio light, no shadows, face filling the frame. This is the setup that lets Nano Banana 2 hold character across variations.]
Fix 3: Iterate, Don't Retry
Most people treat portrait generation like a lottery: run a prompt, get a bad result, run the same prompt again, hope for a better one. This approach ignores the most reliable path to realism — iterative refinement.
Nano Banana 2's real advantage isn't generation quality on the first pass. It's the ability to make targeted edits without degrading image quality across iterations. Edit-to-edit consistency — the ability to change one element while preserving everything else — is more valuable than single-shot output quality.
Instead of regenerating from scratch:
- Get a generation that's roughly right — good composition, correct subject
- Identify the single biggest realism problem (skin texture, lighting, a specific shadow)
- Make a targeted edit: "soften the specular highlight on the forehead", "add warmth under the chin"
- Repeat with the next biggest problem
This approach compounds. Each edit builds on a version that's already partially correct. You're refining, not rerolling.
Putting It Together: The Portrait Checklist
Four changes that move from "plastic" to "real":
-
Swap quality keywords for lighting descriptions. Replace "photorealistic, ultra realistic" with the actual lighting environment: source, direction, temperature, softness.
-
Add translucency cues. Include "soft subsurface glow", "natural skin translucency", or light passing through thin tissue areas (ears, nostrils). These are physical descriptions, not quality descriptors.
-
Fix your reference image. Neutral light, portrait crop, no hard shadows. Test it for consistency before scaling.
-
Iterate, don't regenerate. One targeted edit at a time, building on what's already working.
These aren't model-specific tricks. They work because they're describing physics — and any image model that claims photorealism has to follow physics to get there.
Want to test these techniques? Nano Banana 2 on VicSee supports reference images and targeted edits — exactly the workflow described above. New accounts get free credits, no credit card required.
Try it now: Nano Banana 2 | Nano Banana Pro | All Image Models
FAQ
Why do AI portraits always look like plastic or wax figures?
The plastic look comes from how AI models render skin as an opaque surface. Real skin is translucent — light enters the tissue, scatters, and exits at a slightly different point. This property is called subsurface scattering. When AI models skip this physics, the result looks like a face-shaped plastic object rather than a human face. Fixing it requires specifying lighting conditions in your prompt rather than quality keywords.
What does "subsurface scattering" mean in AI image prompting?
Subsurface scattering is the physical property that makes skin (and other organic materials) look real rather than plastic. In prompting terms, you can't directly invoke it as a keyword — the model produces it as a byproduct of accurate lighting descriptions. Prompts that specify light source, direction, diffusion, and temperature give the model the physics it needs to render skin correctly.
What's the difference between "photorealistic" and specifying the lighting?
"Photorealistic" is a quality target — it tells the model what you want the output to look like, not what physical conditions to simulate. Lighting descriptions are physical inputs: they tell the model where the light is coming from, how it hits the face, and how it scatters. The model can derive realistic skin from lighting physics; it can't derive it from the word "photorealistic."
How do I use a reference image to improve portrait consistency in Nano Banana 2?
Use a reference image with neutral, even lighting — no directional shadows or harsh contrast. A portrait crop where the face fills most of the frame works best. Avoid references where parts of the face are in deep shadow, as the model will reproduce that shadow in every variation. Test the reference with 3-4 variations before scaling: if the outputs are consistent, the reference is clean.
Is Nano Banana 2 good for portrait generation?
Nano Banana 2 is specifically well-suited for portrait work because it supports reference images for character consistency and handles iterative edits without quality degradation across generations. The model maintains identity across edits — changing lighting, expression, or background while preserving the subject — which is the workflow that produces the most realistic results.
If you're generating portraits with AI, the most reliable path to realism is physics, not vocabulary. Describe the light. Clean the reference. Iterate one change at a time. New accounts get free credits, no credit card required.
Generate your first portrait: Nano Banana 2